
Poinsettia Cupcake Tutorial
By Jeannie Gearin
Poinsettias and pastels are a beautiful addition to any holiday table. Here is a cupcake project to try even if you have never made gumpaste flowers before.
Supplies Needed:
- Rolling pin
- Pasta roller (optional)
- Small Poinsettia cutters, 3 sizes
- Petal veiner
- Foam square
- Foam pad
- Pink luster and pearl dust
- Super Pearl luster dust
- Pixie Dust
- Paint brush
- Ball tool
- Pink, white and green fondant with tylose powder added
- Cupcakes
- Pastry bag with large round tip, such as Ateco #807
- Buttercream frosting
- Piping gel
- Multi colored pearl dragees
- White sugar sprinkles
Procedure:
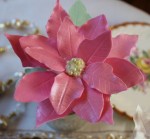
1. Roll out pink fondant as thin as parchment. If using a Kitchen Aid pasta roller attachment, set it to #5. I combined two different poinsettia cutters to get the variety of small petals that I wanted. The finished flower will have two outer rows of 5 petals and one inside row of 3. Cut about 13 – 15 petals per cupcake for the amount you wish to make, allowing for breakage and flower variety. Three green leaves are needed for each cupcake.
2. For each petal, place in the center of the veiner, press firmly but gently with the foam square. Then, move to the foam pad and roll the outside edges with the ball tool. (Picture # 10) Take care to just ruffle and thin the edges without losing the veining. Set on egg foam or similar surface to add shape to petals as they dry. (Picture # 3) Allowing to dry overnight is best, but the petals are very thin and may be dry enough to dust after several hours.
3. Mix the petal and luster dusts together and carefully brush color onto the dry petals. (Pictures 19 and 22) Once the petals and leaves are dry, it’s time to frostthe cupcakes. With a large round tip and buttercream frosting, pipe a large mound on the top of the cupcake. Place three leaves into the icing at opposite angles. Use the largest petal and space evenly to make a circle of 5 petals. (Picture # 35) Use the medium size petal and alternate (Picture # 38) this row of five between the first row, slightly tilting the petals upward. End with the smallest petals in a tighter row of three. Add a small bead of piping gel in the center and attach dragees to the center. Sprinkle with sugar crystals.
Author bio
Jeannie Gearin is a cake decorating instructor at several locations St. Louis, MO. She has been sharing her passion for baking and decorating for over 20 years. Visit her at www.thepastrytip.blogspot.com or https://twitter.com/thepastrytip.
Looks perfect; I will definitely try this.