Baking Bread in A Dutch Oven – Tips Techniques and More!
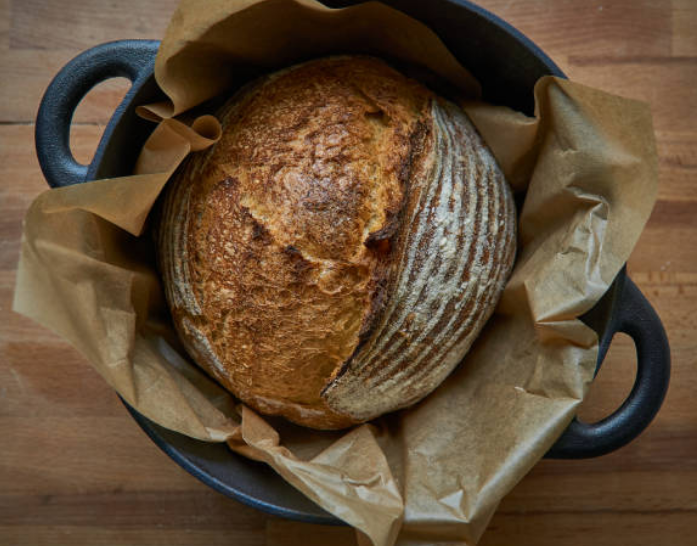
Baking bread in a Dutch oven is one of the first tasks a beginner bread baker takes on when beginning their baking journey at home—and I’m no exception. It can be difficult to introduce steam into your oven when making bread, so using a sealed pot makes this process simple and inconspicuous. The release of steam from the dough during the initial stages of baking causes moisture to be retained within the sealed container, which promotes a crunchy, shiny crust and maximum volume.
What is a Dutch Oven?
A Dutch oven is a high-quality pot with a lid that is intended for browning food and then simmering or cooking in the oven. For simpler tasks like boiling pasta, it can also be used for soup. In addition, it is used to make bread. Many of the well-known brands, such as Le Creuset and Staub, are well-known while others, such as Lodge and Cuisinart, stand out as strong performers.

Although they have different looks, Dutch ovens serve the same purpose as stockpots: for instance, the bases are wider and shorter while the walls are slightly thicker, allowing for better browning and caramelization of ingredients and retaining heat, while also serving as pieces that keep food warm on the table.
For even and steady handling in and out of the oven, they have two short handles on either side (versus one long handle on traditional pans).
 Which Dutch is Best For Baking Bread?

Enameled Dutch ovens are commonly used for baking bread. Enamel is created by rapidly heating powdered glass until it melts and then drips into a glaze to form a smooth, shiny finish. To complete the non-stick coating on the cast iron pot, an enamel coating is applied to it.
It is impressive that your enameled Dutch oven has those properties. It can reach high temperatures and maintain those temperatures for a long time. It is scratch-resistant, is non-flammable, and it is very easy to clean.
Why Is Baking Bread in a Dutch Oven a Good Idea?
Using a Dutch oven to simulate the bakery environment that pro bakers have (sealed chambers with intense and (mostly) even radiative heat) helps the average home baker mimic these professional bakers. A Dutch oven has ample thermal mass to maintain an even temperature for baking.
A second advantage of using the sealed interior is the trapping of steam, which is a key component to bread baking. During the first part of baking, moisture in the oven causes bread to rise, intensifies the crust color, adds more hues to the crust, and also increases shininess on the outside.
Benefits of Baking Bread in a Dutch Oven
More Volume
In the first part of baking, steamless ovens produce uneven baked bread with a hard crust on the outside. Because of this early crust formation, the oven spring is hindered, resulting in loaves that are both squat and dense.
Moisture and suppleness around the dough’s exterior keeps it soft and pliable, allowing it to expand and lengthen before becoming firm and “setting.”
To produce benefit, it does not require an inordinate amount of steam. During the first 20 minutes of the bake, there is enough steam generated by the dough to form fabulous loaf volume.
Amazing Crust
Crusts that are well-colored with a gradient from almost-white to a deep mahagony have a simple elegance that is hard to surpass. Before the enticing smell of food hits you, your mouth is already watering.
During our earlier discussion, we discussed how steam that was trapped inside the Dutch oven settled on the outside of the dough, keeping the temperature low and even. Ensuring the exterior of your loaf doesn’t darken before you finish baking the interior assists with making sure the exterior is fully baked before the interior.
“The slower exterior bread temperature helps the enzymatic activity to continue for longer,” says Jeffrey Hamelman in his book BREAD. This long-lasting activity that occurs throughout the entire fermentation process also contributes to the red coloring of the crust.
In addition to promoting gelatinization, a well-steamed oven also promotes starch absorption. As heat raises the temperature of the starch molecules on the outside of the dough, the starch swells and eventually dissolves, forming a thin liquid layer (starch gel). This final layer bakes hard and turns into a thin and shiny coating with a barely perceptible sheen.
It’s a no brainer to bake in a sealed pot when you consider all of these great benefits. Nevertheless, there are some problems with the method. The biggest of these is that the pan might be a bit thicker and possibly burned at the bottom. Let’s examine several ways to assist in lessening this challenge.
How Do I Prevent Burning The Bottom of My Bread?
You can place a baking board or cookie tray under the Dutch oven to reduce the thermal transfer which will protect your bread from burning. It will not only stop your surface base from being burnt, it will also prevent the development of such a thick crust on the bottom.
You can try moving the rack, but if you have a large, dutch oven it may not be possible so it’s much easier to place a baking sheet underneath.
Do you grease a Dutch oven when baking bread?
Resist the urge to grease your Dutch oven. Because of the high temperature, the fat will almost immediately burn off, leaving your bread with a charred flavor.
Should I preheat my Dutch oven for bread?
When using a Dutch oven, you want it to be boiling hot, not just heated. The first rise of the bread depends on high heat in the first stages of baking.
Remember that the pot acts as an incubator: the iron from which the dutch oven is made is heated in the oven, which then evenly heats the bread from all sides (unlike a baking stone, which radiates heat only from the bottom, which can result in a thinner crust or even burnt bottom, but the crust above is dependent on the heating elements of the dutch oven).
It’s critical to pre-heat the oven and the Dutch oven for around 30 minutes before inserting the bread. Most sourdough bread should be baked at a temperature of around 240° C (450° F). This is the starting temperature, which will be lowered subsequently.
Tips To Remember When Baking Bread in a Dutch Oven…
- Invest in high-quality ingredients, particularly flour. If at all possible, stay clear from retail brands. The higher the quality of the flour, the more delicious your bread will be.
- It makes no difference whether you use a regular black cast-iron Dutch oven or an enamel-coated cast-iron Dutch oven. The bread comes out flawlessly every time as long as you have a lid to cover it. I discovered that a 4- to 6-quart Dutch oven produces the ideal round form.
- Resist the temptation to oil your Dutch oven. The fat will almost quickly burn off due to the high temperature, giving your bread a burned flavor.
Need to make a more healthy bread? Learn how to substitute butter for something more healthy.