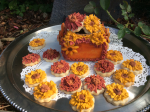
Grace your holiday table with this Autumn Centerpiece Cookie Box Filled with Mini Flowers, created by Cookiepreneur Amyee D. VanDyke of The Wacky Cookie Company.
Fall is right around the corner. Harvest, celebrations and family gatherings begin. One of the things I most enjoy about calling Northern Virginia home is the color of the foliage in the fall. I drew inspiration from the color of the changing leaves in order to create this cookie box, which is fairly simple to put together, and just covered it with leaves piped in royal icing, flowers (3-D sugar cookies baked in a cupcake liners in a cupcake tin) and filled the box with mini flower cookies to adorn the table and enjoy!
Note: If you wish to use these as a gift for each guest, you can make an additional plaque cookie and add their names to it.
Equipment
|
|
Components of Project
- Cookies, Construction of 3-D cookies and Cookie Box
- Covering Cookie Box
- Final Touches
Cookie Recipe:
|
|
*Optional but adds a beautiful boost of vanilla flavor to your cookie
Pre-Cookie Baking Prep:
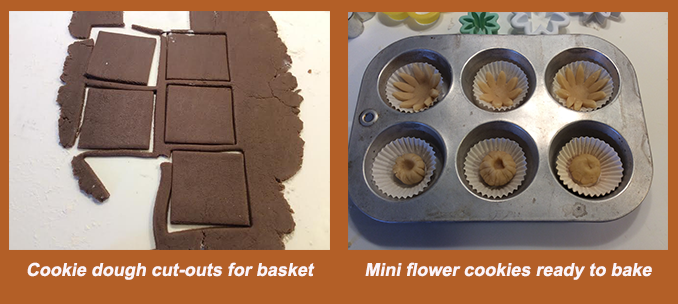
Select a square cookie cutter. You can use whichever size you prefer, depending on how you will use the box. In this case, I used a 2.5 inch square cutter, as my intention is to create three boxes to place on a long table for 8 guests.
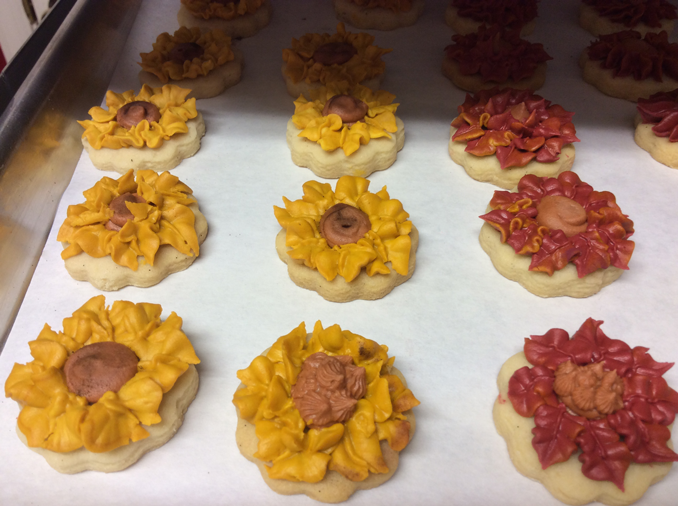
Select several flower cookie or fondant cutters. For this project, sharp long petals work best, so anything that resembles a daisy, sunflower or gerbera will do. (See pictures of cookies).
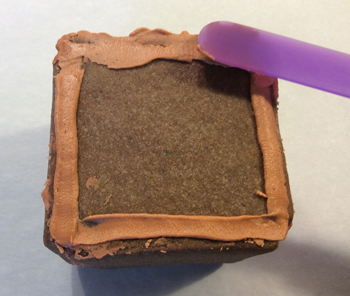
Remember that cookie dough always spreads a little in the oven, so you may have to bevel your cookies with the x-acto knife or even a fruit peeler before you construct your box.
Cookie Preparation:
- Preheat oven to 350 degrees F.
- In a mixing bowl, add butter, sugar, eggs, vanilla extract, vanilla caviar and lemon/lime extract and beat at medium speed for about a minute or until well blended and creamy. Take care not to overbeat your butter.
- Add baking powder to flour.
- Add flour gradually in 2 parts. (Be sure to switch to a dough hook or heavy paddle attachment after creaming butter and before adding flour as cookie dough will become dense).
Rolling out, Cutting and Baking Cookies:
This dough does not require refrigeration and will not spread as long as your butter is room temperature or colder.
- Flour surface and roll out dough to ¼ inch thick.
- Tint the part of the dough that you will use to construct your box (enough for about 6 squares). I used Warm brown by Americolor and a hint of brown by Wilton. Cut out your square dough and place it on the cookie sheet.
- Take your floral cookie cutters and cut out three or four of each flower. I recommend using three different sizes of the same cutter. See pictures of the multi-layered cookies to see how I have constructed them by stacking them.
- Take the smallest flowers (unbaked dough) and line a cupcake pan with cupcake liners and place them inside to bake. Remember to make extras as these tend to break easily, particularly when you paint them with your petal dust.
- Bake additional mini-cookies. You choose the size and shape. The idea is to be able to decorate the minis in order to fill the box with these, so make 8 for each box.
- Bake cookies for 15-18 minutes or until golden brown. Rotate half way between at about 8 minutes.
- Remove from oven and place on cooling rack until completely cooled and completely stiff EXCEPT for 3-D flowers in cupcake tin. Allow those to fully cool in the cupcake pan and then remove.
CONSTRUCTING THE 3-D COOKIES
Note: Prepare petal dusts and brushes. I used Stargazer, Sunflower Yellow and Bark by Crystal Colors along with a drop of orange gel paste by Americolor and used vodka to dilute the paint color and dust my flowers without covering them in royal icing.
- Start by painting and dusting the individual cookies in the colors you would like. I pre-stacked them to see how they would look before I stacked and glued them, but remember you must paint them individually before you stack them and allow them to dry. (See picture).
- Paint cookies individually, allow to air dry overnight or place in dehydrator for two hours and stack and glue with royal icing.
- See picture below of finished cookies.

Glue the base of the box to one of the ends. Be sure to loosely construct the box first by fitting all four pieces together and beveling when necessary for a tighter fit. Use any kitchen items, such as an upside down glass or any other object that is handy and heavy enough to hold up the front and the sides of the crate temporarily. You want to make sure they fit well before you start cementing them together with your Candy melts or royal icing.
 Finalize by turning over after you have glued the box together and let it stand overnight by sealing the bottom with royal icing. This should be done to avoid the box coming apart. Be sure to make the icing smooth and leveled in order to avoid wobbling or it sitting unevenly due to clumps of royal icing on the bottom.
Royal Icing
|
IMPORTANT: Prepare a batch and a half if you will be using royal icing as cement for your crate instead of the candy melts.
Royal Icing Preparation
- Add powdered sugar, meringue powder and cream of tartar to mixing bowl. (Make sure that mixing bowl is 100% free of fat or oil; this will cause your royal icing to not set properly).
- Using wire whisk attachment, start on lowest speed and begin adding water until meringue starts coming together, add vanilla extract and continue beating and increase speed gradually until icing is thick and forms stiff peaks. (Icing should be so thick that a spatula can stand in it).
- Recipe should yield approximately 5-6 cups of stiff consistency icing.
Coloring and Preparing Royal Icing for Piping Bags
Separate royal icing into the see through 8 oz. plastic cups, as listed below. Please be aware that each decorator works differently and you may use a bit more or less of icing, and these are approximate amounts. You always want to err on the side of mixing more of a color than you may need, as it is very difficult to go back and recreate the same exact color if you do not make enough.
Various Colors Gel colors: Americolor– Red, Gold Royal Purple . Wilton– Buttercup. Crystal Colors Edible Color Dust – Tree Bark, Sunflower & Stargazer
You will need the following approximate amounts to complete the project as pictured.
- 1-1/2 cups Wilton Buttercup with Americolor Gold
- 1-1/2 cups Crystal Colors Stargazer, 2 drops Americolor red and just a speck of Americolor Royal Purple ( with the tip of a toothpick).
I Used Wilton tip 352 to pipe both the leaves on the box and on the mini cookies that fill the crate.
You can prepare these colors and put them in the 8 oz. transparent plastic cups as holding receptacles before you add them to your piping bags. Doing this will ensure that you have achieved the proper hues you would like, as some of these colors become deeper an hour or two after initially mixing.
You can use these colors I have suggested above as used in my arrangement or mix and match. I encourage you to get creative and try combinations of your favorite colors. I chose the warm golds and burgundy as they are classic fall colors but I invite you to use your imagination and make something spectacular. Play with the petal dust after they dry for contrasting hues.
Final Decoration of Flower Box
- Take your completed flowers and put a large dab of royal icing in the center and glue to each either side of the box.
- Start using your creativity and filling in the box by piping leaves or additional flowers around the flowers that you have glued onto the box. I would advise you to work on one side at a time carefully, allowing ample time for each side to dry so as not to damage it.
- Add your mini cookies to the inside of your cookie box and you are ready to go.
Have fun putting your own version of this arrangement together as I did creating it for you. Wishing you a beautiful and festive fall 2015.